Spotlight on an Artist- Igor Mosiychuk


Igor Mosiychuk is one of a number of Russian or Slavic (is that even a designation anymore?) painters I really like. He produces a lot of nature scenes using wet-into-wet methods. Just gorgeous stuff. I found him on Facebook, and you can too, here. Every time he produces something, he's just killing it. Just wonderful control of wet into wet. I've wondered some about the number of failures he's got in the garbage can. I wish I knew that, just to put the hard work into perspective, but regardless, everything he's posting (and he shares frequently) is just... lovely. They're all interesting. They make me jealous.
Here's a few more-

Using my google-fu, I found two Russian videos of him in action. They provide some telling clues to his process. I know some (very rusty) Russian, and he talks pretty slowly, so I can make out some of what he talks about- working wet into wet, how an artist has to know what he wants to paint before he starts to paint, how it's all resting in his mind first, that sort of stuff. It's not his words that are most telling though, it's watching him paint. In this first video, you can see that he starts by wetting both sides of the paper. He's clearly painting big- 1/2 to full sheet. So, there's lots of room for him to control the movement of the washes and for the wet into wet process to work. You also get a view of his brushes and palette. He uses a variety of sizes and hair types, mostly likely to help with making fewer, bolder strokes, and to help control how much water he adds when working small. As for his palette, he clearly falls into the messy palette category! :P

Combining the first video with this second one, I can deduce a few other things. As with the first, my presumption is he's prewetting the paper (like Sergei Temerv does in my other blog post), and it sticks to the backing because of water tension. There's no tape on the edges but nothing is buckling, and when he starts off with the sky and mountains, everything is already very soft and wet-into-wet. You can see him cut edges early on (for the distant shoreline), by simply lifting with a tissue. I've done this with scratching as well. Water tension on the surface of the paper holds things in place. Essentially, you're creating a drier streak to hold the paint above it in place. For things like darker branches, he actually is painting them relatively early, but they're not blooming- most likely because the paint on the brush is thicker. Also note how he picks up a smaller brush- it holds less water, so the ratio of pigment to water is higher. By the time he reaches the bottom, things are beginning to dry, which is how he gets the dry brush strokes for the shoreline.
Now, if we look at a few more of his images, we can sort of pick apart his process and see a bit of how he's getting to where he is. The primary focus, for me, is to look at the edges. This was a little mini-revelation for me last fall in the Joseph workshop, where he told us to pay attention to the edges when "deciphering" the process of a painting. This is very useful! So, soft edges tell us it's all in one go. Hard edges tell us some time has passed and the paper is drying. Darker values come in later, lighter values are preserved unless the paint has been lifted- either with water or a hard edged tool (like a palette knife or a finger nail).

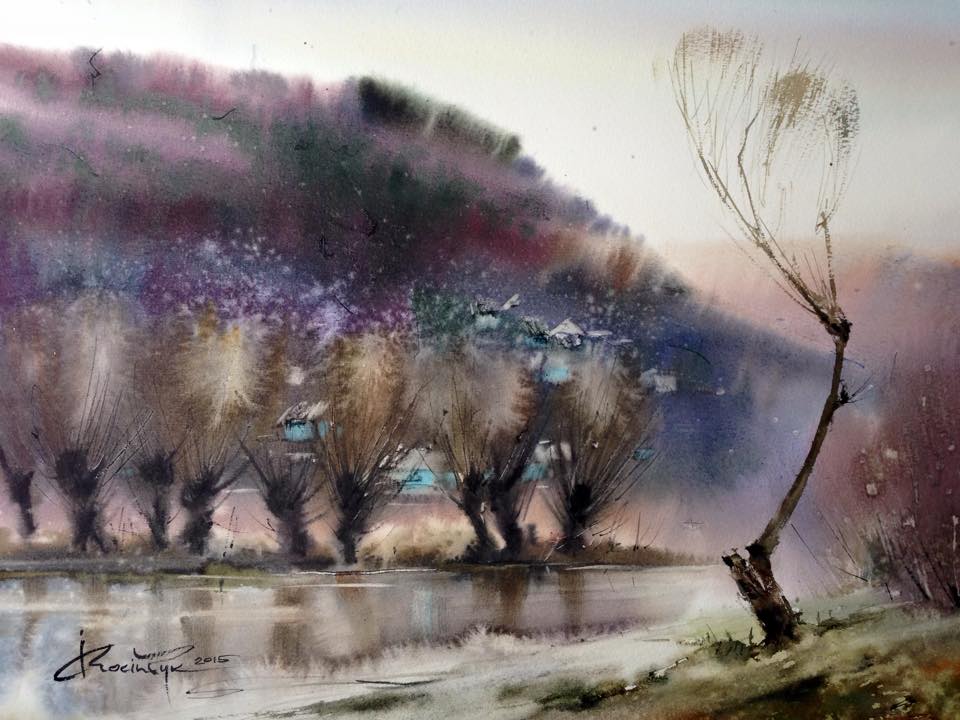
This first one has a lot of wet into wet. Note how the path has those very soft edges, and there are these areas to the sides of the path with rivulets or "fingers" merging the spaces together. This is most likely coming from dropping water into the painting at a later time with long thin strokes, when it's wet enough that the water will push the paint away but dry enough that the paint still holds an edge. Hard! You can also see the dry brushstrokes in the foreground and the hard edges of the tree in the foreground- clearly done late in the painting process.

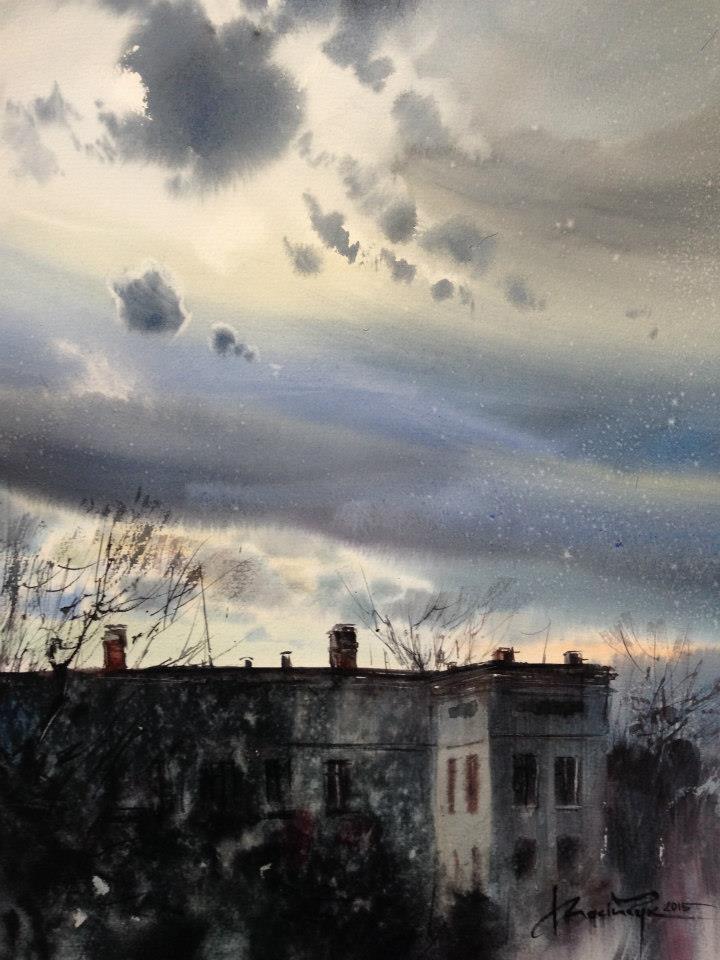
I wanted to touch on a variety of things in this next one, that might be easiest if we start at the end and work our way backwards. The boat and rocks go on last- that's the easy part. They're the darkest and have the hardest edges. Note the drier speckled edges on in the water and in the foreground. Things were starting to dry up a bit when he went in here. It looks like he probably scratched the paper for the winding path in this one- the buildup of a darker paint value at the sides and end of the strokes indicates that. you can also see that the distant mountain has a bit of a hard edge- it was clearly done after the sky had dried a tiny bit.
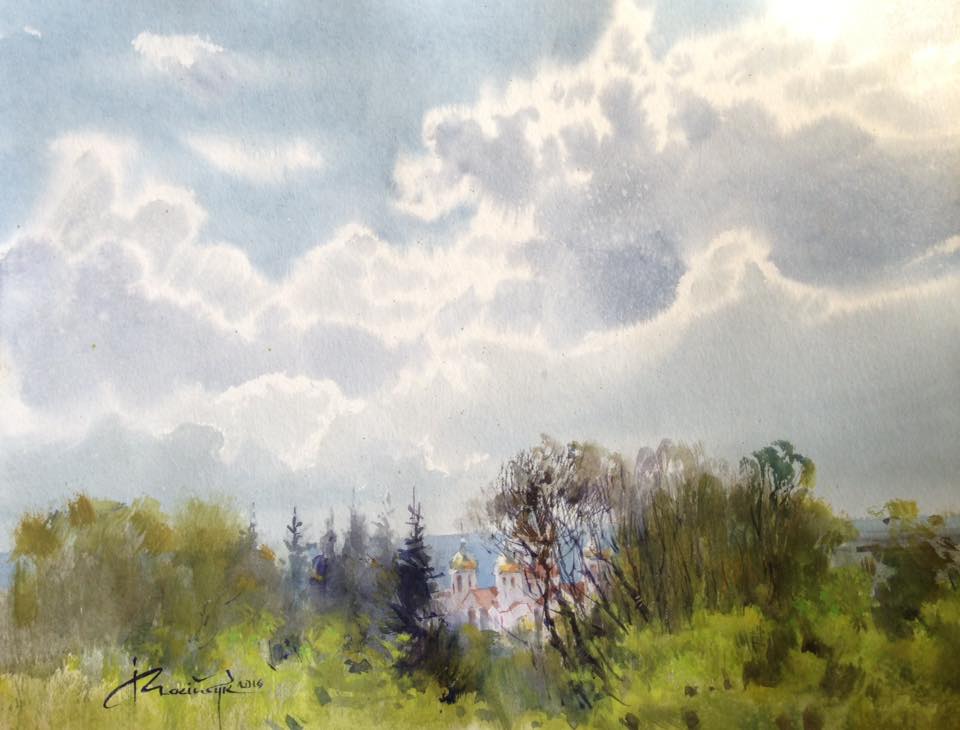
What's really interesting to me, though, is the clouds! I would presume he did the smooth gradated wash for the sky first- the blue into orange into purple. You can see on the upper clouds where the blue is softly dispersing into the white that he preserved. You can also see the orange clouds he put in at this early phase as well. But once he did that, he had to have waited a bit, and then dropped the darker "foreground clouds" into the existing sky. These fantastic darker clouds add a wonderful sense of depth to the sky and have a slightly drier edge. And not only does he do them in the distance, but even over the larger clouds in the upper section of the painting. If you look at the upper right corner, you can see that the cloud color is clearly the darker purple of the little clouds in the distance, and not the blue of the sky- but here the purple is wetter and merging with the orange. My suspicion is that he had the purple ready and put it in at different times- once early on, where it merged with the orange wet into wet, and again later on, where the edges are firmer and there's less running. Love it!
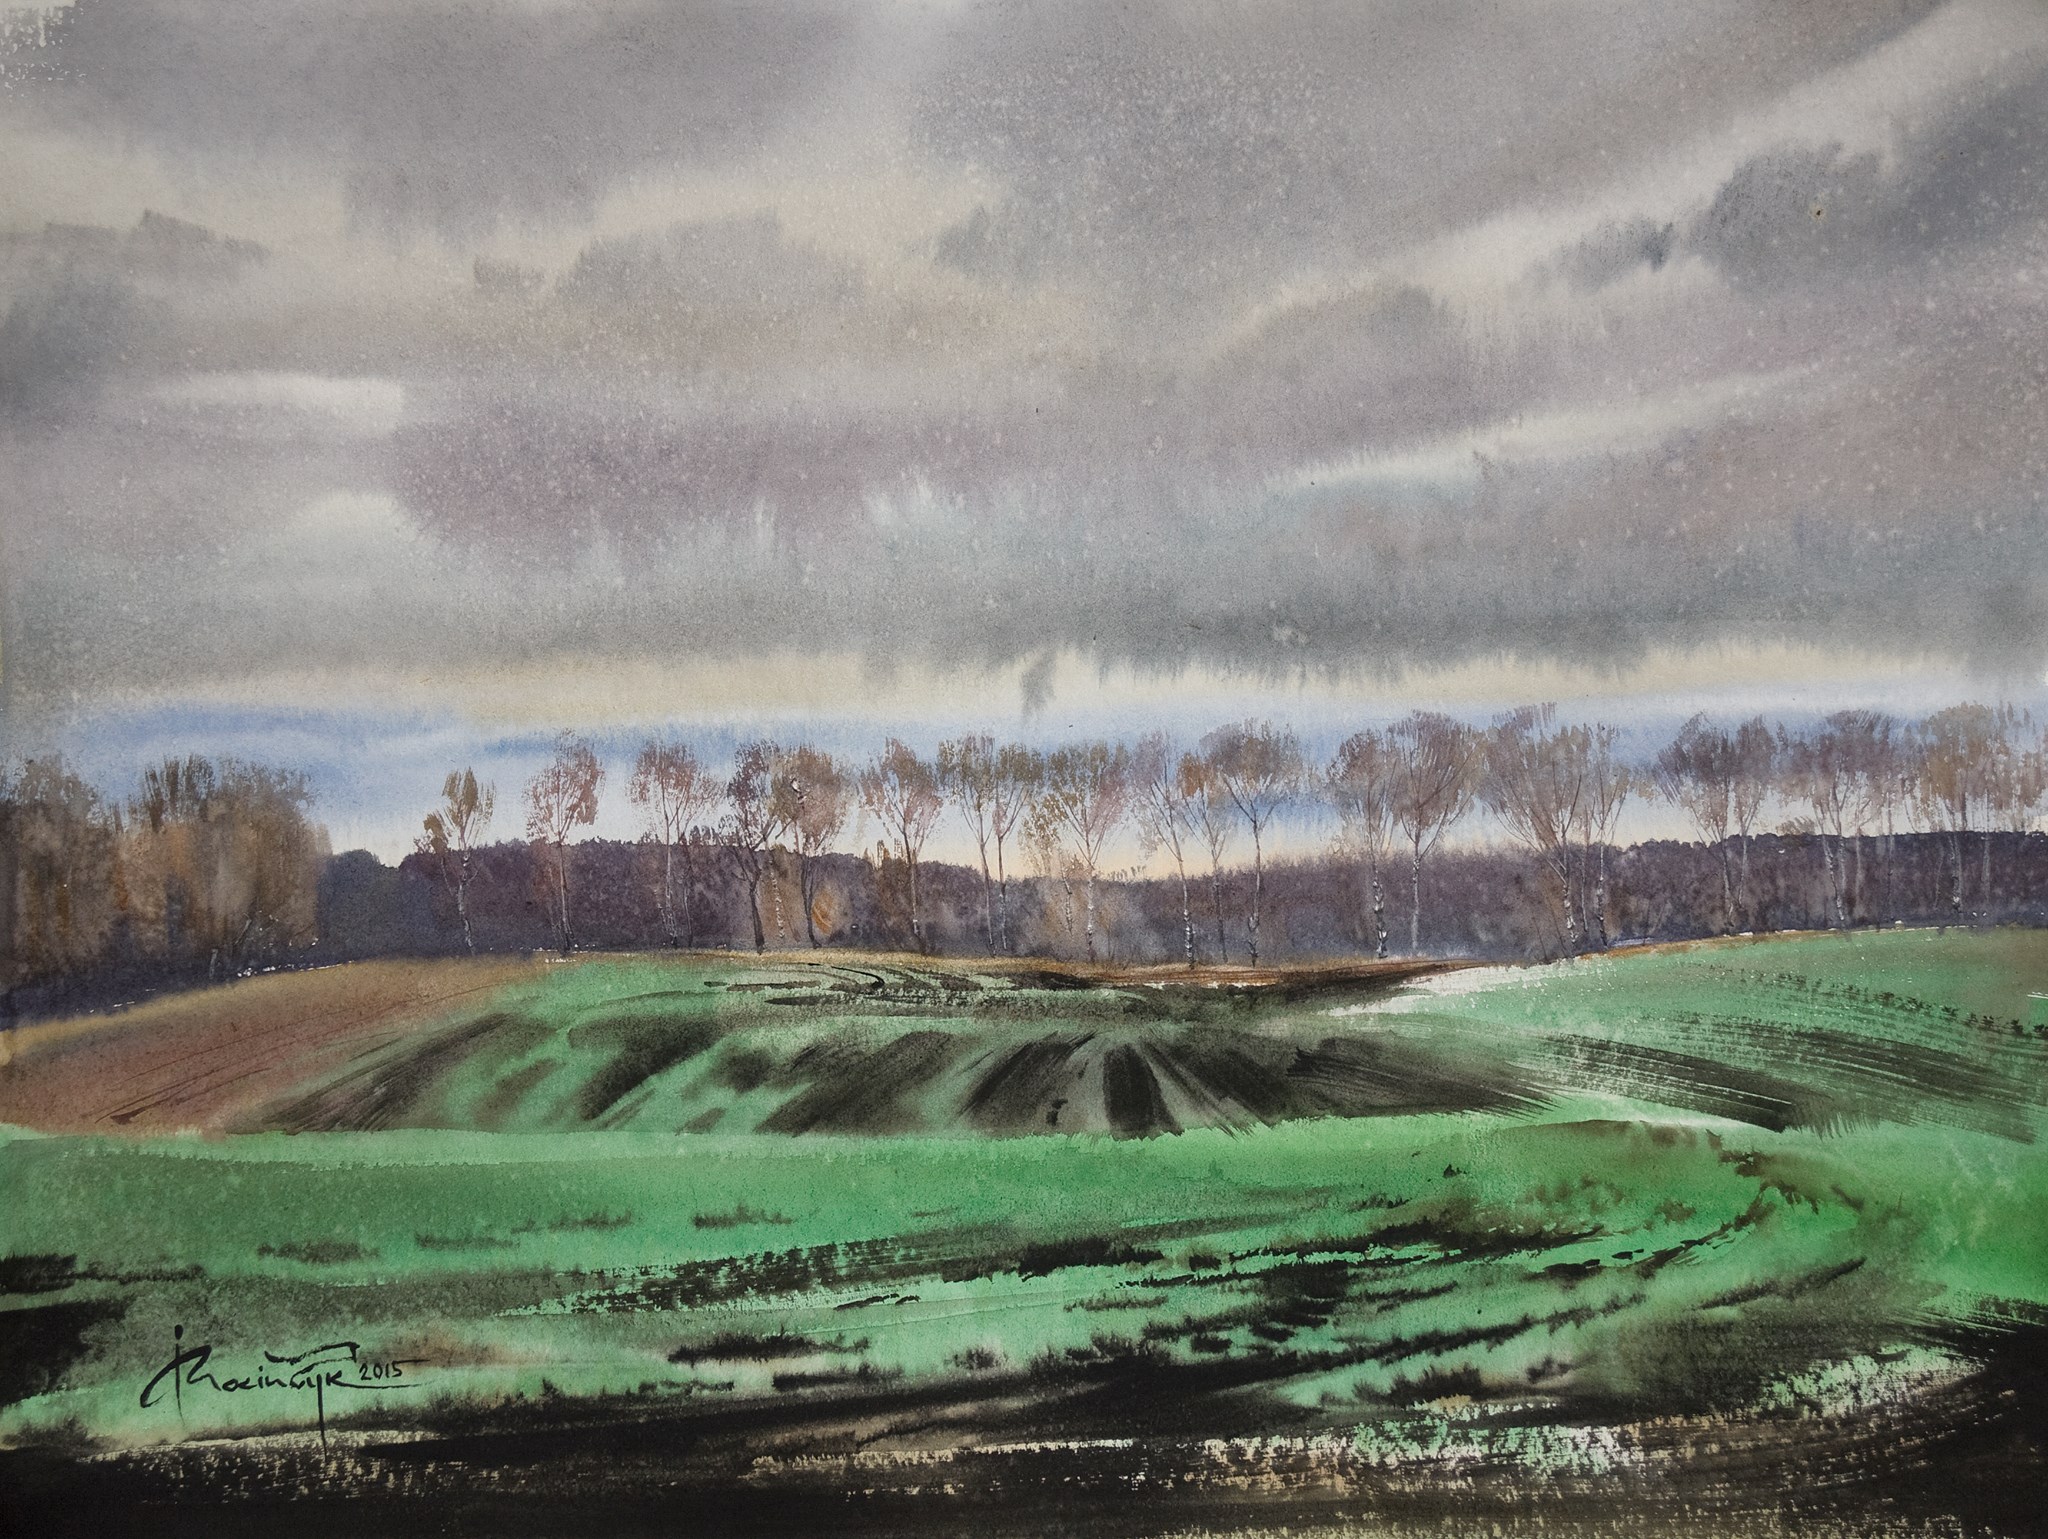
Here we have clouds and hills done as before, but the sneaky bit to look at is how the distant green hill on the right has a drier section. My guess? He painted down to the horizon line, did the clouds and faraway hills, and then worked on the green and brown hills after things had dried a bit. Obviously, the very dark streaks are done both wet-into-wet as well as later when its drybrushed in. Both types are there. The mix must have been pretty thick, as they daubs don't spread much. Then he sweeps in the bold foreground with what looks like one really big brushstroke, and finally he does the distant trees. You can tell all the trees are done after the sky has completely dried, because they have very fine drybrush work for their leaves.

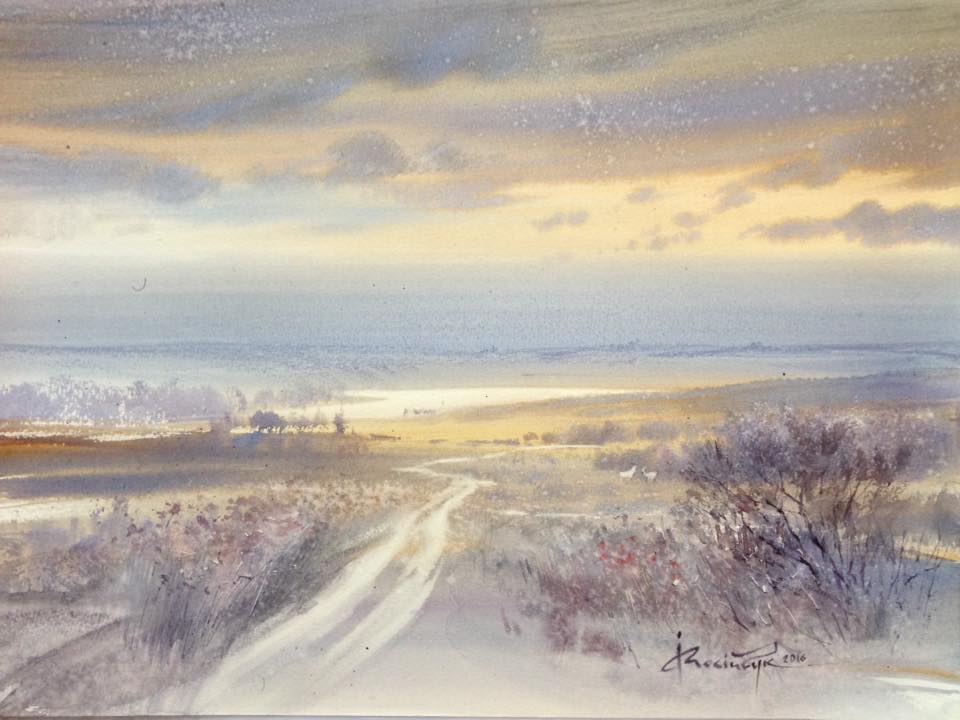
This gorgeous last one follows many of the same precepts as the earlier ones. Something to note is that the sky isn't actually white- it looks like a pale warm wash went in first, even behind the hills. The clouds are wet into wet, but not too early! They still largely retain their shape. In the middle are some guazy highlights in the clouds- did he actually preserve those tiny things, or or did he slightly lift them with a tissue? I'm not sure. All the speckles are from sprinklers of water done after a little while- the paper has to be cool to the touch, but not too wet, or the water will create giant blooms. The hills are done wet on dry, as the top edge is dry, and the distant trees are wet into wet. Then down the page he goes, varying his color in horizontal streaks to create depth. At the bottom, the dark red-brown area has some lovely streaks of water swept through it, to get those filigreed fingers. Last is the trees with the dark dry branches against the hills and clouds.
And that's it for now. If you're interested in seeing more of Igor's work, I would visit his Facebook page. He has photo galleries up that he regularly updates. You can see almost 100 of his paintings there. Lots of interesting stuff, and you can see his style slowly change and refine itself over time. A great artist, well worth following!